Getting things running
As I mentioned in my previous post, my friend Chris over in the UK was able to aquire a Victor V86P laptop, and very generously sent it on to me. The V86P is an IBM PC XT compatible laptop, released in 1989 by Victor Technologies. Quite a neat little unit, they had the following specs:
- 80C86 CPU running at 10MHz (with 4.77MHz available as a keyboard shortcut)
- 512k or 1MB RAM
- Either 1x 720k FDD and 1x 20MB HDD
Or 2x 720k FDDs - CGA graphics, capable of driving either the LCD panel or an external display
- Monochrome LCD display (no backlight)
- 1800mAh 6V NiCd battery pack
- CMOS BIOS configuration storage, backed by supercapacitor
- Real Time Clock
- 1x Parallel Port
- 2x Serial Ports (16450 UART)
- Expansion bus connector
Unfortunately, the system we found had been separated from its PSU at some point the in the past - whether it died, or was simply lost we don't know. As a result, powering the unit up to test was complicated slightly. Two options were available here - the power connector (a 3x2 .1" pin header on the side of the system), and the battery connector (a 3-pin header inside the battery compartment). I know from my original system that it's possible to power the system by feeding 6-7.5V into the battery connector; and helpfully the folks at the ACT Sirius 1 user group have put up the power connector pinout. The latter option having a minor caveat that someone over on the vogons.org forum had looked at their PSU and noted that pin 1 was not Gnd, as indicated in the pinout, and did in fact carry a voltage - something to investigate later!
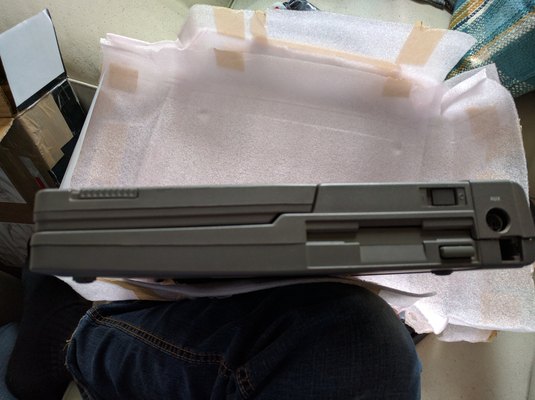
Power connector to the bottom right
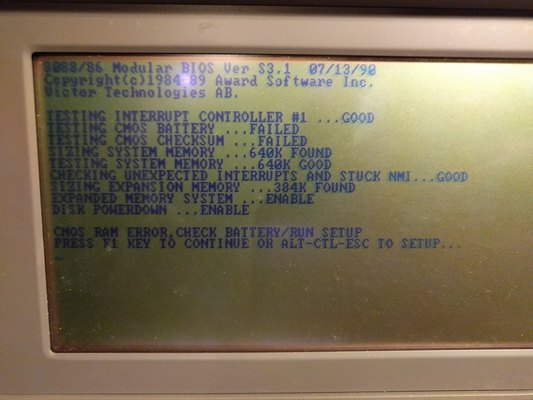
The battery connector was easiest to deal with, as the three pin header is Batt+, Batt-, and a sense line connected to what I /think/ is a thermister shrink-wrapped into the battery pack. This is something I'd investigated with my Grandpa back in the 90s, and we'd determined the system runs fine with that pin disconnected. I hooked up a bench PSU to the battery input, set it for 6V, flicked the power switch, and... nothing. A faint click from the internal speaker, but no lights, nothing on the screen, no drive activity. The system wasn't drawing much current, just a few mA, so clearly something wasn't right. I opened it up to take a look, and decided to start by disconnecting the hard disk controller, which also removes the power connection to the hard disk. This time, when I flicked the switch, we got life! The system started to POST (failed on the CMOS battery - supercap was obviously discharged), but passed everything else, however it was beeping, and the Low Battery LED was illuminated. Increasing the supply voltage to nearer 7.5V cleared this, until the system started to boot from the floppy drive, causing a low battery beep and red light every time it went to seek. Other than this, the system seemed to work fine - keyboard and display are both good, and the floppy drive clearly works.
At this point, I'm suspecting we might have have a hard disk problem - something causing it to load down the rails and prevent the system powering up. First thing to check - plug in the controller but disconnect the disk. In order to do this, the whole system has to be stripped down as the hard disk cable is soldered directly to the controller board, and the hard disk is mounted underneath the motherboard. After pulling the machine apart and removing both hard disk and floppy drive, but leaving the hard disk controller connected, I tried powering it up again - this time it passed the POST, but as expected didn't detect either drive. Yet more things pointing to a hard disk problem - time to go digging.
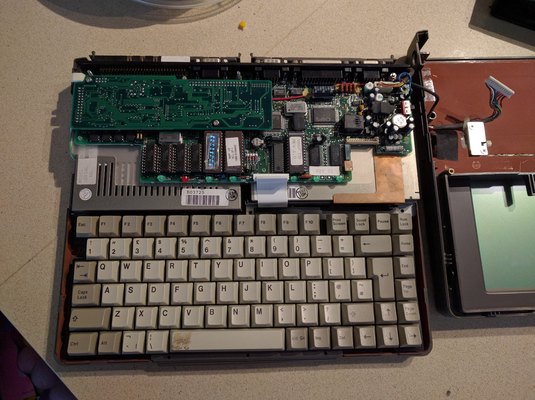
Internal view show hard disk controller daughterboard top left
The next think I tried was to connect the hard disk back up, but leave the floppy drive disconnected. This time the system came up, but the hard disk made a horrible noise - sounded like it was trying to spin up, but something was having issues. The hard disk in this system is a JVC drive, using a proprietary 26-pin interface - I'll leave a lot of the description of the drive to a later post. There isn't much information about the drive out there, but there is a pinout of the connector, and that shows that the last three pairs of pins on the connector carry 5V and 12V power lines (two pairs for 5V, one for 12V). It didn't take much to hook those pins to an ATX PSU and power it up - lo and behold, the drive spun up! After all that, it looks like a power issue - running the hard disk (like floppy seeks), is loading down the 5V rail and causing the system to crash.
With that discovery, the next thing was to attach the hard disk to the laptop, but supply power from the ATX PSU I had on the side of the bench. After doing that, the laptop see the hard disk, and booted right up into MS-DOS 5.0. So after all that, all the key components of the system work, it's just a matter of identifying what's going on with the power supply.
Next was to look at the one piece I didn't expect to work - the battery pack. I know from my original system that this is a shrink-wrapped cardboard tube filled with five sub-C sized NiCd cells. According to the label on this pack, it's an 1800mAh pack, but putting a meter across it showed it to be totally discharged. Just out of interest, I setup my bench supply for 180mA constant-current, and hooked that up to the battery. After watching it for a while, it was taking the current, the voltage was slowly cominh up, and the pack wasn't getting at all warm. After leaving it overnight, I checked it again - still not warm. Taking it off charge, and it showed a voltage of 7.5V - just what you'd expect from a freshly charged 5-cell NiCd pack. Over the next 48 hours that dropped off slightly, down to 6.5V or so, then held steady. Maybe the pack isn't totally dead after-all! Hooked it up to the machine, flicked the power switch, and... nothing. Then again, the system wouldn't power on with 6V on its battery input from the bench supply either. I'm guessing the DC-DC converter on the motherboard needs a recap, so that'll be the next major job to do.
One more post after this one to document what I've done with the system so far, then it's properly into Retrochallenge work on this system
Leave a comment
You must be logged in to post a comment.